MCC Code Generation
The following covers the basic MCC operations and code generation process, which helps users to setup and configure MCC according to their needs.
Selecting and Configuring Modules
After opening the MCC, the peripheral and library modules can be added to the project by following these steps:
- In the Project Resources Area, select the peripheral or library module which needs to be configured by clicking on the module’s name. See 2. below image.
- Configure the peripheral as required for the application in the Configuration Options Area.
- Configure the pins in the Pin Manager depending on the application requirements.

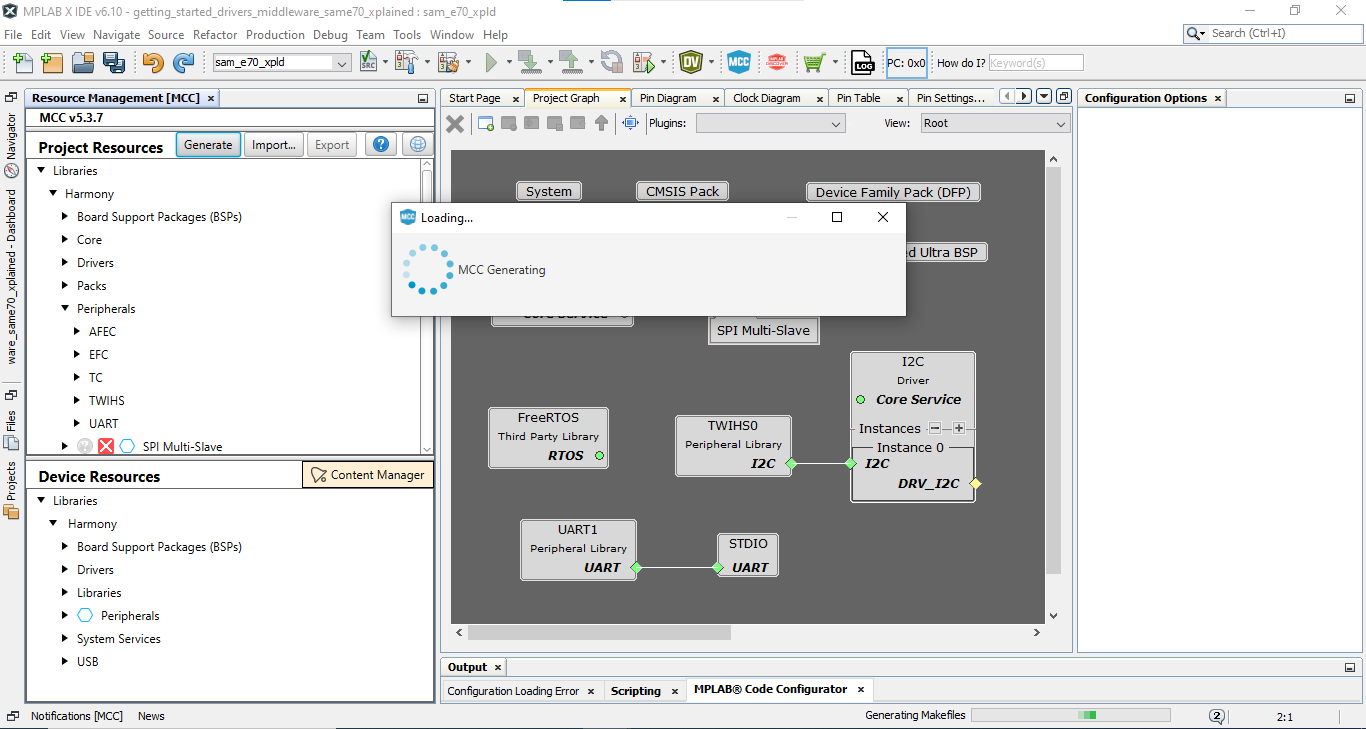
Code Generation
To perform the following actions, press  MCC Generate button in the Project Resources window.
Saving and Loading the MCC Configuration
Saving and loading the MCC configuration is integrated into the MPLAB® X IDE Load functions. The MCC configuration is saved whenever the Generate button is pressed.The MCC configuration file is included in the MPLAB® X IDE project, under the Important Files folder. The configuration file uses the extension .xml. Double-clicking on the MCC configuration file will cause that MCC configuration to be loaded.

Merge Window
If any of the files generated by the MCC has been edited outside of MCC and saved to the disk, then the Merge [MCC] window will appear in the Configuration Options. The Merge [MCC] window allows you to decide whether to keep the edits, or to replace them with the MCC newly generated code. When the newly generated MCC content has been accepted, MCC makes the changes to the file. To the MPLAB® X IDE, these changes are the same as if you typed in the new content. The normal MPLAB® X IDE edit undo can be used in the MCC Merge operation.
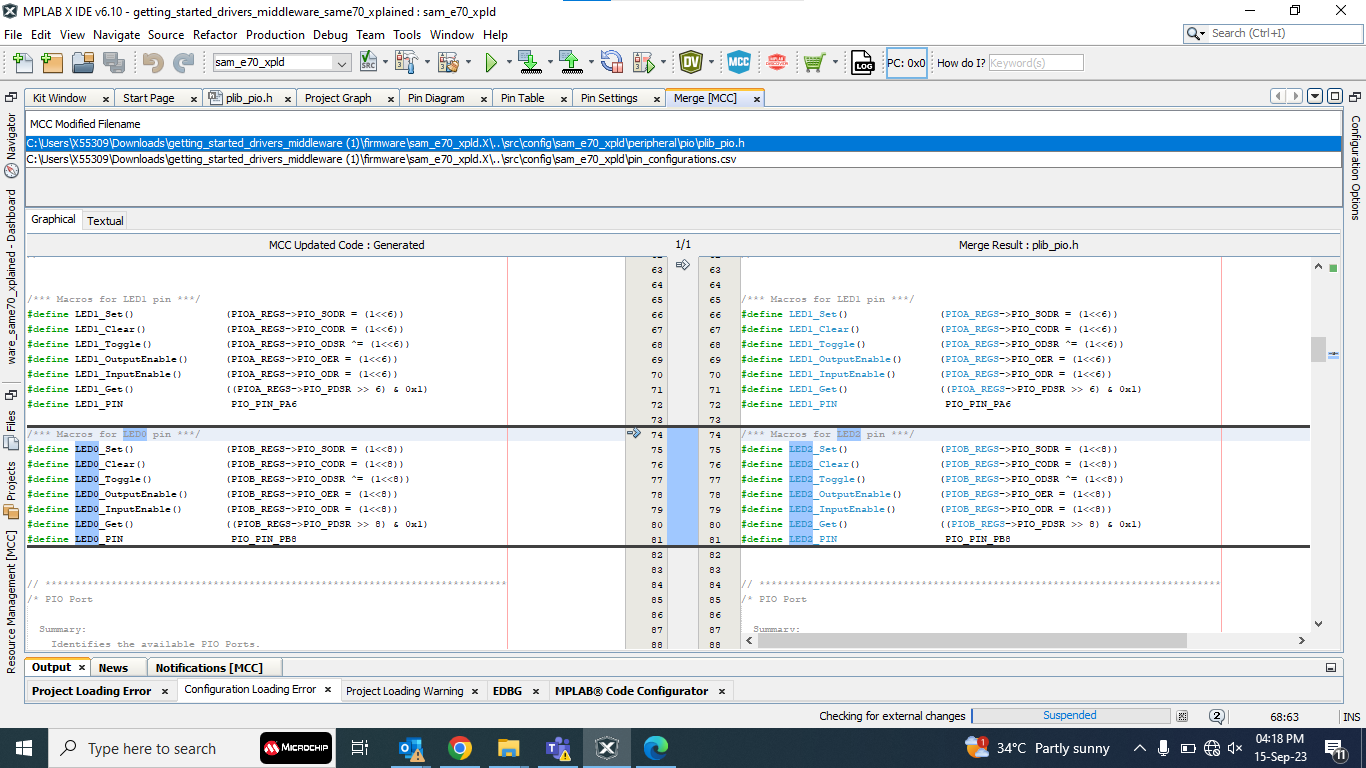
A list of all the files that need to be merged appear one after another after resolving the merge conflicts. You must resolve merge conflicts to ensure that all the newly generated code is incorporated into the project. At the top of the Merge [MCC] window, in the center margin, there is an arrow, as shown in the following Merge Window Figure. Clicking on the arrow will replace all your edits in the current file with the MCC updated code that the MCC has just generated. The numbers above the arrow indicate the current difference and the total number of differences. The individual lines of MCC Updated Code can be selected to replace the edited code. As shown in the following Merge Window Figure, clicking on the arrows in the right margin of the left window will copy the MCC Updated Code to the generated driver file. Once the changes are accepted, the Merge mechanism will remove the highlighted file and highlight the next file on the list. To insure all updates are completed, a warning will be generated if the Merge mechanism is closed before all the changes are accepted.
Note: Your edits will never be overwritten by the MCC generated code, except by explicit action in the Merge [MCC] window.
When changes have been made both to a generated file and in the corresponding MCC UI within the Configuration Options, the Merge [MCC] window shown in the following Merge Window Figure will be displayed. The Merge [MCC] window allows you to resolve the conflicts between the newly generated file and the edits you have made to the file.
Merge Window Figure
Generated Source and Header Files
The generated code will be included in the active MPLAB® X IDE Project as shown in the below image. The header files are shown on the top and source files are shown on the bottom.
Note: In the image below, the icons are used to organize the project virtual organization of files, not an actual one.
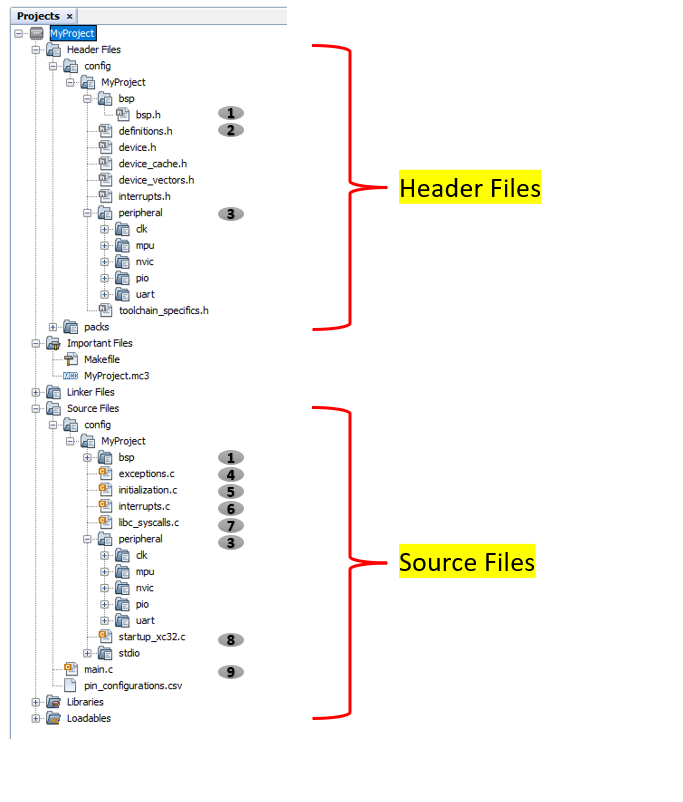
The following table provides the Header and Source files generated from the sample project:
| # | Source File | Descriptions |
|---|---|---|
| 1 | bsp.h | Provides Board Support Package |
| 2 | definitions.h | Provides all library headers and definitions needed for the application |
| 3 | Peripheral (libs) | Supports peripherals used by the project |
| 4 | exceptions.c | Implements all exception handlers |
| 5 | initialization.c | Initializes all libraries and applications |
| 6 | interrupts.c | Provides the interrupt vector table |
| 7 | libc_syscalls.c | Provides the Harmony specific system calls |
| 8 | startup.c | Startup code for the application |
| 9 | main.c | Applications Main source file |
Note
This page has been verified with the following versions of software tools:
- MPLAB X IDE v6.20
- MPLAB XC32 Compiler v4.40
- MPLAB Code Configurator Plugin v5.5.1
- MPLAB Harmony v3 “csp” repo v3.18.5
Because Microchip regularly update tools, occasionally there could be minor differences with the newer versions of the tools.