
3.1.4.1 UART Hello World
Getting Started with Peripheral Building Blocks
Getting Started with Central Building Blocks
BLE Peripheral Developers: FreeRTOS and BLE Stack Setup --> Adding UART --> Legacy Advertisements
BLE Central Developers: FreeRTOS and BLE Stack Setup --> Adding UART --> Legacy Scan
Introduction
This document describes in detail on how to enable UART functionality on WBZ451 Curiosity board using MPLAB Code Configurator.
Users can choose to just run the precompiled Application Example hex on the WBZ451 Curiosity Board and experience the demo or can go through the steps involved in enabling UART from scratch using MPLAB Code Configurator
Recommended Reading
Hardware Requirements
| Tool | Qty |
|---|---|
| WBZ451 Curiosity Board | 1 |
| Micro USB cable | 1 |
SDK Setup
Software Requirements
Programming the precompiled hex file or Application Example
Programming the hex file using MPLABX IPE
-
Precompiled Hex file is located in "<Harmony Content Path>\wireless_apps_pic32cxbz2_wbz45\apps\ble\building_blocks\chip_peripherals\uart_hello_world\hex" folder
-
For more details on the steps, go to Programming A Device .Note: Users must choose the correct Device and Tool information.
Programming the Application using MPLABX IDE
-
Follow steps mentioned in Running a Precompiled Example document.
-
Open and program the Application Example "uart_hello_world.x" located in "
<Harmony Content
                            Path>\wireless_apps_pic32cxbz2_wbz45\apps\ble\building_blocks\chip_peripherals\uart_hello_world\firmware
using MPLABX IDE. - For more details on how to find the Harmony Content Path, refer to hh how to find what is my Harmony Content Path.
Demo Description
This Application e xample enables users to print data over a terminal emulator like TeraTerm
Testing
Connect the WBZ451 Curiosity board to PC, program the application example. Open TeraTerm(Speed: 115200, Data: 8-bit, Parity: none, stop bits: 1 bit, Flow control: none) and select the COM port that is enumerated when connecting the WBZ451 Curiosity Board. Reset the board and Demo will print "Hello World"
Developing the Application from Scratch using MPLAB Code Configurator
-
Create a new MCC Harmony Project. For more details, refer to 2.5 Creating a New MCC Harmony Project.
-
Import component configuration: This step helps users setup the basic components required to start the Application Development component configuration related to this Application is available. The imported file is of
format .mc3and is located in the path "<Harmony Content Path>\wireless_apps_pic32cxbz2_wbz45\apps\ble\building_blocks\chip_peripherals\uart_hello_world\firmware\uart_hello_world.X". Users must follow the instructions mentioned Saving/Importing Individual Peripheral MCC Configurations to import the component configuration.Note: Import and Export functionality of component configuration helps users to start from a known working setup of configuration. -
Accept Dependencies or satisfiers, select Yes.
-
Verify if the Project Graph window has all the expected configuration.

Verify UART Configuration
-
Select SERCOM0 component in project graph. The Transmit pinout configuration is for without hardware flow control.

Select system component in project graph
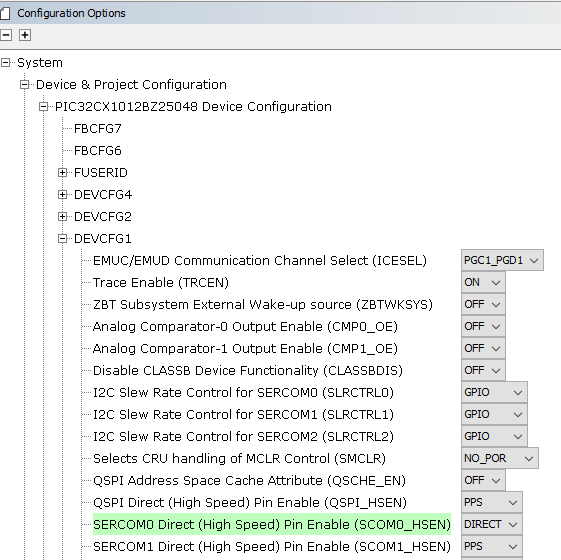 Important:
Direct - Digital peripheral is enabled on the default dedicated pins and can operate with Maximum Clock Frequency
PPS - Digital peripheral is enabled on pins selected by the MCC pin configurator and can operate with Maximum Clock Frequency/2
To enable SERCOM0 hardware flow control on WBZ351 curiosity board using RTS and CTS, configure the TxD/RxD/RTS/RTS as below. At the same time keep "SERCOM0 Direct (High Speed) Pin Enable (SCOM0_HSEN)" of DEVCFG1 as PPS.

Generating a Code
For more details on code generation, refer to 14.2 MPLAB Code Configurator(MCC) Code Generation.
Files and Routines Automatically generated by the MCC


Header Files
-
Header File associated with the sercom0 peripheral library or any other peripheral library for a different example is included in
definitions.hfileNote: To use all the SERCOM0 functionality include thedefinitions.hfile in Application code
Function Calls
MCC generates and adds the code to initialize the UART peripheral in SYS_Initialize() function
-
SERCOM0_USART_Initialize() is the API that will be called inside the SYS_Initialize() function
User Application Development
Include
definitions.hin app.c(definitions.his called to include theperipheral.hfiles)app_idle_task.hin app.c
Transfer Data using UART
Add app_idle_task() in the function vApplicationIdleHook() in freertos_hooks.c
SERCOM0_USART_Write() is the used to submit a write buffer to the given USART peripheral to transfer data, user can call this API in APP_STATE_INIT:
Users can exercise various other UART/SERCOM functionalities by using the peripheral library documentation
Where to go from here
Central role BLE Scanner
Peripheral Role BLE Advertisements
Peripheral Role BLE Extended Advertisements