
12.5.4 Serial Bootloader Demo
This section explains Boot loading over the serial port.
Hardware Requirements
One WBZ451 Curiosity Board
USB Cables
PC
Software Requirements
MPLABX IDE/IPE
MicrochipUtilityTool.exe
Bootload enabled Firmware Image (ble_sensor.signed.unified.hex, BootloaderTimerBasedxxx.hex)
Bootload enabled binary image (ble_sensor.signed_uart.bin)
Procedure
Device can put in DFU Mode by one of the following methods
GPIO (SW2 Button Press)
Timer Based
GPIO Based DFU mode
-
Program WBZ451Board with the Image file(ble_sensor.signed.unified.Hex)
-
Start MicrochipUtilityTool.exe
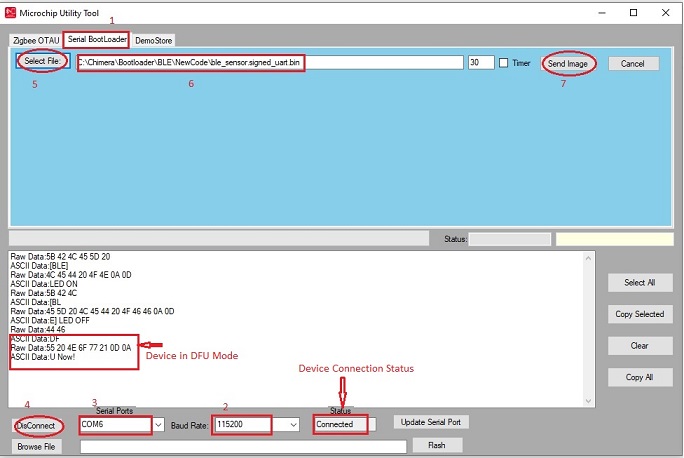
Follow the steps mentioned in the above picture
Select Serial BootLoader Tab
Select Baud Rate as 115200 from the drop-down menu
Select the device Serial Port from the drop-down menu
Click on Connect/DisConnect Button
Press reset button on WBZ451 board, UART Rx message appears in the log window.
Press and hold SW2 and then press and release reset Button on the WBZ451 Board and then release SW2 button
WBZ451Board will enter in DFU mode. The following message will appear in the log
DFU Now!
Click on Select File Button and choose ble_sensor.signed_uart.bin file
Click on Send Image Button
Image starts, downloading into WBZ451 device. Progress bar keeping advancing and debug status (Frame: Byte Sent: Time(hh:mm:ss)) keeps updating
Figure 12-98. Figure 8: Serial Bootalod Demo End(GPIO) 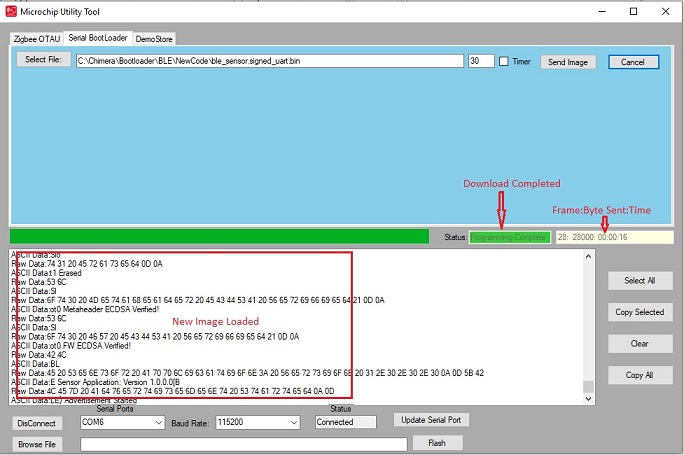
Wait for Image download to complete (Progress bar = 100%, Status= Programming Complete)
Press reset button on WBZ451 Board. Slot1 is erased and new image is copied from slot0 and start executing new image.
A new command (0x12) has been added in the Tool. This is the last command sent during DFU process. If this command is supported in Boot loader code, then the WBZ451device will be automatically booted into new image.
Timer Based DFU mode
Program WBZ451 Board with the Image file (BootloaderTimerBasedxxx.hex)
Start MicrochipUtilityTool.exe
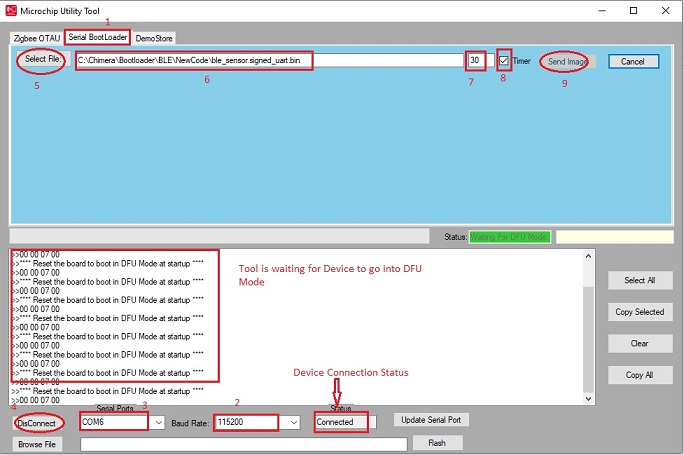
Follow the steps mentioned in the above picture
Select Serial BootLoader Tab
Select Baud Rate as 115200 from the drop-down menu
Select the device Serial Port from the drop-down menu
Click on Connect/DisConnect Button
Connection status as Connected.
Click on Select File Button and choose ble_sensor.signed_uart.bin file
Enter (Decimal Integer) Timeout period (step 7). Default is 30 sec.
Check Timer
Click on Send Image Button
Tool will wait for WBZ451device to be in DFU mode for a time period entered in step 7(Default 30 sec)
Press Reset Button. The device will enter in DFU mode. The following message will appear in the log
DFU Now!
Image starts, downloading into the WBZ451device. Progress bar keeping advancing and debug status (Frame: Byte Sent: Time(hh:mm:ss)) keeps updating
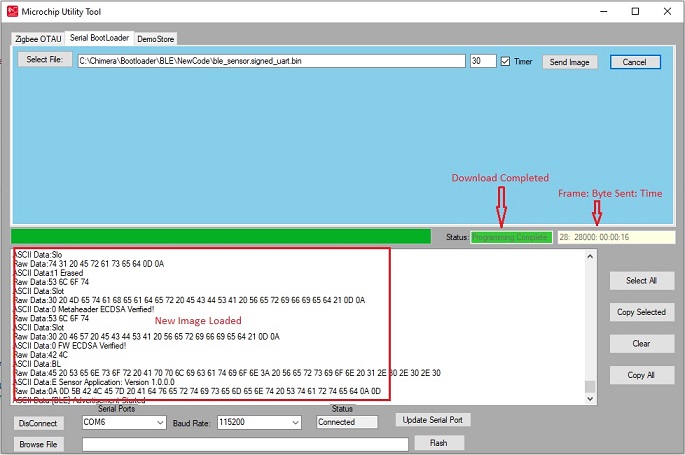
Wait for Image download to complete (Progress bar = 100%, Status= Programming Complete).
The device will automatically boot into new image.
Summary
Frame size = 4096 bytes.
Image (size = 161920 bytes) takes 16 sec to transmit.
Default Timeout (30 sec) can be changed in the tool
Timer Based Bootloading mode will automatically boots into new image after image download. No need to press reset button.
GPIO based Botloading mode can also boot automatically into new image if a new command (command #0x12) is added into bootloader code.