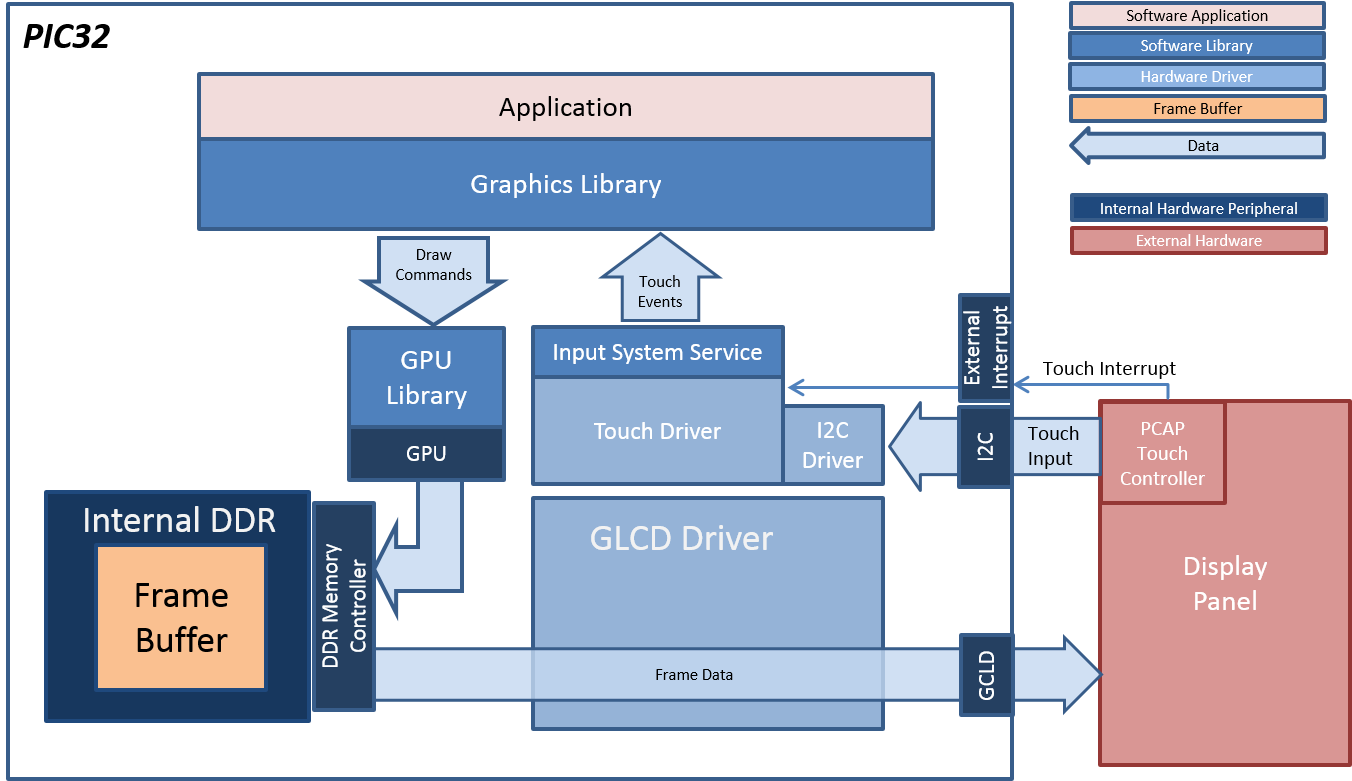
The aria_oven_controller application uses the MPLAB Harmony Graphics Library to render graphics to the display in a RGB565 color mode. The Graphics library draws the widgets and images to a 16-bit frame buffer which is stored in the internal SRAM of the PIC32MZ DA device. Using the Graphics Display Controller (GLCD), the PIC32MZ DA Display Driver continuously transfers frame data to the LCD display. During display refresh, the application will use the GPU to update the frame buffer using the nano2D software driver, which retrieves data from the staging area (source) for all image assets.
The demonstration contains five UI screens:
- Splash Screen: initial boot display
- Home Screen: controller demo idle state display
- Controller Screen: brick oven roasting control UI
- Info Screen: information and help
- Asset Layout Screen: image asset memory location and usage
Image assets are pre-rendered from internal Flash memory to SRAM on application start. Each image is accessed during runtime to create dynamic sprite affects and motion. The layout and location of images were positioned using the GFXLIB Graphics Composer Suite (MHGC) to produce accurate coordinate location and efficient memory use. Note that there exists space for additional images. The layout is shown in the following figure:
During run-time, the GPU is used to clear, colorize, blit and draw. The application uses n2d_blit() to block copy images from the SRAM staging area onto the refreshing frame buffer. The application uses n2d_line() to create the timer affect, and uses n2d_fill to clear the orange active menu button bar.
All motion effects make use of the n2d_blit (stretch/shrink) feature by setting the destination rectangle smaller or larger that the source rectangle (image). Image transparency is established by setting the background of the image to the display background. In addition, the application uses the Timer System Service and core timer clock ticks for image motion control.
The application is touch enabled. It features user touch input through the integrated touch screen on the display panel. Touch input from the touch controller goes through the I2C port, and the Input System Service acquires the touch input information from the Touch and I2C Drivers. The Input System Service sends touch events to the Graphics library, which processes these events and updates the frame data accordingly.
- 16-Bit RGB 565 Frame buffer
- Image manipulation
- 480x272x2 Image staging memory space
- Modern drop-shadow, gradient image assets
- Internal memory: low memory frame buffer footprint 262K
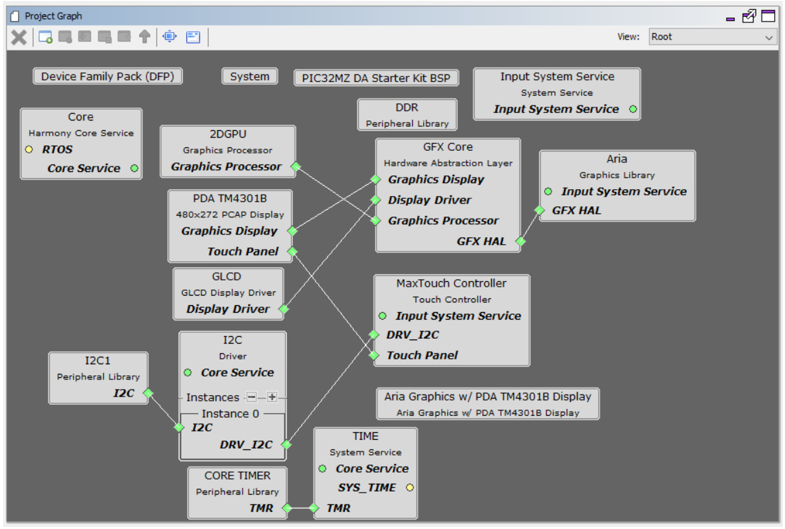
The Project Graph diagram below shows the Harmony components that are included in this application. Lines between components are drawn to satisfy components that depend on a capability that another component provides.
Adding the “PIC32MZ DA Starter Kit BSP” and “Aria Graphics w/ PDA TM4301B Display” Graphics Template component into the project graph will automatically add the components needed for a graphics project and resolve their dependencies. It will also configure the pins needed to drive the external peripherals like the display and the touch controller.
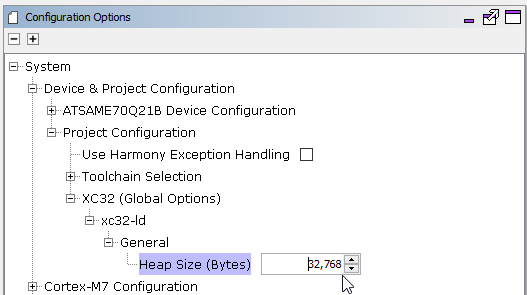
The heap size is set to 32768 bytes. The heap is set in Device & Project Configuration -> Project Configuration -> XC32 (Global Options) xc32-ld -> General -> Heap Size option in the “System” component.
The parent directory for this application is gfx/apps/aria_oven_controller. To build this application, use MPLABX to open the gfx_apps/aria_oven_controller/firmware/aria_oc_mzdas_sk_meb2_tm4301b.X project file.
The following table lists configuration properties:
|
Project Name |
BSP Used |
Graphics Template Used |
Description |
|
aria_oc_mzdas_sk_meb2_tm4301b.X |
PIC32MZ DA Starter Kit |
Aria Graphics w/ PDA TM4301b Display |
Aria GFX on PIC32MZ DA with Internal DDR Starter Kit, MEBII and PDA TM4301b Display |
 Note: Note: |
This application may contain custom code that is marked by the comments "// START OF CUSTOM CODE ..." and "// END OF CUSTOM CODE". When using the MPLAB Harmony Configurator to regenerate the application code, use the "Prompt Merge For All Differences" merging strategy and do not remove or replace the custom code. |
PIC32MZ DA Starter Kit and MEB II
Configurations: pic32mz_ef_sk_intddr_meb2
- On the MEB II, the EBIWE and LCD_PCLK (J9) must be jumpered. A connection establishes the GLCD’s pixel clock timing. The external SRAM memory on the board is disabled. The jumper (J9) is available on the bottom side of the board under the starter kit. The J9 jumper is located on the bottom of the MEB II board, beneath where the starter kit attaches to the board. Refer to the following image for the exact location
- Connect the PIC32MZ EF Starter Kit board to the MEB II board
- Power up the board by connecting the power adapter to J3 power connector on the MEB II board or a powered USB DEBUG port on the Starter Kit board
![]()
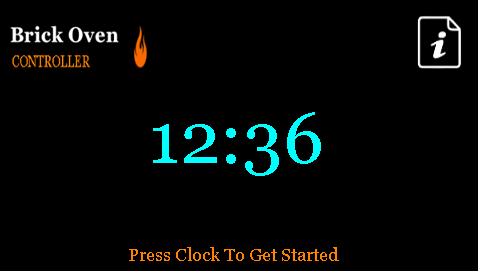
On startup, the application will display a Splash Screen. After the splash screen completes, the Controller Screen is shown. In this screen, the Brick Oven Logo, Information button, and current time is displayed.
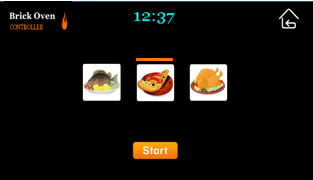
When the current time area is pressed, the Controller Screen is shown. On the display, the Brick Oven logo is reduced by 50% and positioned to the upper left corner of the screen. Three fire roasting bake options (fish, pizza, turkey) are displayed. When the user presses a button, an orange active bar is displayed over the button, and the start button is made visible as well as the pre-set cook time. When the Start button is pressed, the flame animation will start and the timer will tick down to zero. When the time has finished, the Done button will be made visible, or the user is allowed to cancel before completion.
Each screen has a button that provides a transition to another screen.

|
MPLAB® Harmony Graphics Suite Applications
|