
The diagrams below show the various software and hardware components for each configuration.
For this configuration, the application uses the Graphics library to render graphics to the display. The Graphics library passes draw commands into the GPU Library, which in-turn draws the widgets and images to the frame buffer that is stored in an external DDR2. Via the DDR2 Memory Controller, the GLCD display controller peripheral continuously transfers frame data from the frame buffer onto to the LCD display.
The application also features user touch input through the integrated touch screen on the display panel. Touch input from the touch controller goes thru the I2C port, and the Input System Service acquires the touch input information from the touch and I2C drivers. The Input System Service sends touch events to the Graphics library which processes these events and updates the frame data accordingly.
The core timer is used by the application and the Graphics library to manage the movement of the splash screen.
- Integrated PCAP Touch Input
- Three graphics layer supported via the GLCD peripheral on the PIC32MZ DA device
- Preprocessed Image assets to leverage GPU peripheral supported
- Sprite animation achieved using Image Sequence Widget
- Parallax
- 32-bit RGBA8888 color depth support (16.7 million unique colors)
- Per-layer frame double-buffering
- Image compression techniques using Run-Length Encoding, PNG, and JPEG
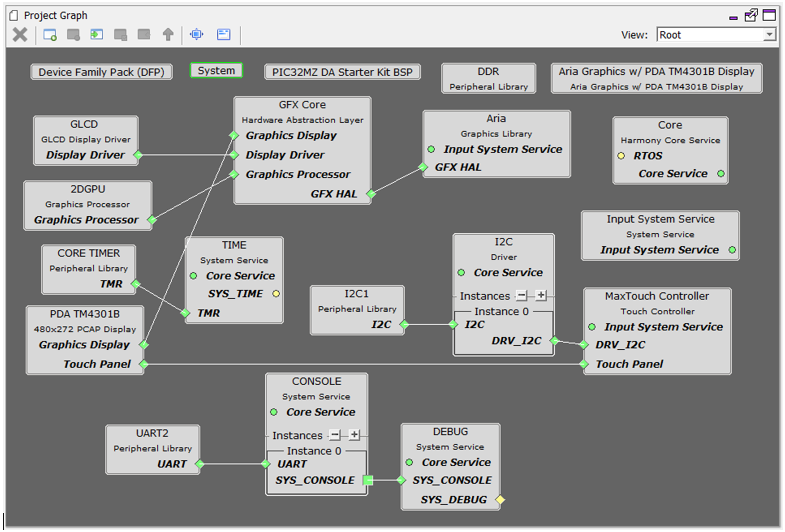
The Project Graph diagram shows the Harmony components that are included in this application. Lines between components are drawn to satisfy components that depend on a capability that another component provides.
Adding the “PIC32MZ DA Starter Kit BSP” and “Aria Graphics w/ PDA TM4301B Display” Graphics Template component into the project graph will automatically add the components needed for a graphics project and resolve their dependencies. It will also configure the pins needed to drive the external peripherals like the display and the touch controller.
The I2C Baud Rate for the I2C1 component to 1,000,000 Hz.

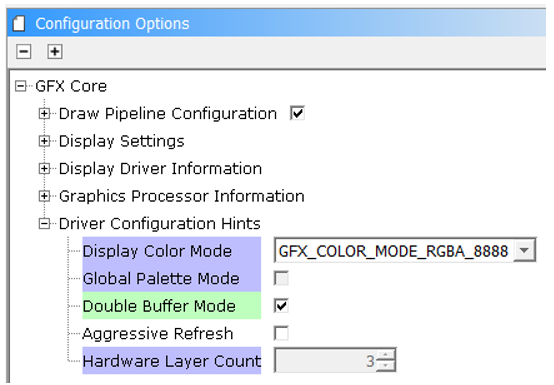
Enable Double Buffer Mode in GFX Core
To build this project, the user must open the aria_adventuret.X project in MPLAB X IDE, and then select the desired configuration.
The following tables list and describe the project and supported configurations. The parent folder for these files is <install-dir>/apps/gfx/aria_adventure.
The parent directory for this application is gfx/apps/aria_adventure. To build this application, use MPLABX IDE to open the gfx/apps/aria_adventure/firmware/aria_adv_mzda_intddr_sk_meb2_tm4301b.X project file.
The following table lists configuration properties:
|
Project Name |
BSP Used |
Graphics Template Used |
Description |
|
aria_adv_mzda_intddr_sk_meb2_tm4301b.X |
PIC32MZ DA Starter Kit |
Aria Graphics w/ PDA TM4301b Display |
Aria GFX on PIC32MZ DA with Internal DDR Starter Kit, MEBII and PDA TM4301b Display |
On the MEB II, the EBIOE and LCD_PCLK (J9) must be jumpered. A connection establishes the GLCD's pixel clock output timing. The external SRAM memory on the board is disabled. The J9 jumper is located on the bottom of the MEB II board, beneath where the starter kit is plugged into the board. Refer to the following figure for the exact location.
![]()
Connect the PIC32MZ DA Starter Kit to the MEB II board

Power up the board by connecting the power adapter to J3 power connector on the MEB II board or a powered USB cable to the USB DEBUG port on the Starter Kit board
Splash Screen
On start-up, the application will display a splash screen:

Main Screen
Subsequently, the demonstrations main mode will appear:

Without any touch interaction, the lamb sprite character remains stationary and loops in an idle animation. Pressing a finger on left or right half of the screen near one of the semi-transparent chevrons will trigger the lamb sprite to start moving towards that respective side of the screen. The longer the finger remain pressed, the “faster” the lamb will travel. Note the speed of the background increases as the lamb seemingly speeds up. The needle on the circular gauge will increase as the lamb travels. When the needle is in the yellow area, the lamb is in “super speed” mode. But if the needle touches the red section of the meter, the lamb becomes “exhausted”. It would fall and become dizzy before recovering. Touch interaction is disabled while the lamb takes a fall and is dizzy. A score is tallied based on how “far” the lamb has travelled before becoming exhausted. A high score is kept for as long as the application has power.
Parallax
The parallax feature is in full demonstration while the lamb is moving, as the speed of the clouds, the rolling hills and the pathway that the lamb is traveling on are all moving at different speed to create an illusion of movement and distance. The art of the background was chosen to be “loop-able”. The application keeps track of which part of the background scenery that is being shown and loops back to the start position seamlessly when the end is reached.
Animations
The animations used to support the lamb include:
- Idle Facing Right
- Idle Facing Left
- Walk/Run Facing Right
- Walk/Run Facing Left
- Super Speed Facing Right
- Super Speed Facing Left
- Fall Facing Right
- Fall Facing Left
- Dizzy Facing Right
- Dizzy Facing Left
The application contains a decision-tree that picks the right set of animation to play out based on the facing direction and the “speed” of the lamb movement on-screen.
Information Screen
Tapping the Microchip logo on the upper corner of the main screen will switch the application to the information screen.
The information screen serves as a screen to list out the demonstrated features of the demo. It also provides two features.
- The features are located on layer1. Sliding a finger up or down will cause the feature list to scroll up and down as if it’s on an invisible glass pane. The MPLAB Harmony logo that is rendered on layer0 is another demonstration of the real-time alpha-blending capability of the GLCD.
- Touching the Microchip logo will trigger no visible change on-screen, but will toggle on/off a hidden “Easter Egg” mode. When the hidden mode is enabled, after going back to the main screen, the lamb character can go into “super speed” mode in-definitely without succumbing to exhaustion.
|
MPLAB® Harmony Graphics Suite Applications
|