When building a new application, start by creating a 32-bit MPLAB Harmony 3 project in MPLAB X IDE by selecting File > New Project. Chose the Configuration name the based on the BSP, and select the appropriate processor (e.g. ATSAME70Q21B).
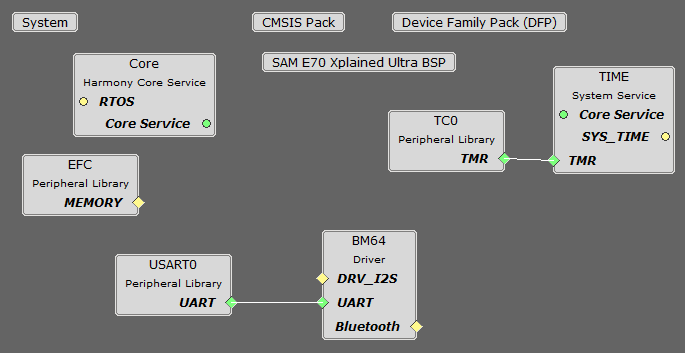
In MHC, under Available Components select the appropriate BSP, such as SAM E70 Xplained Ultra. Under Bluetooth->Templates, double-click on BM64 Bluetooth. Answer Yes to all questions.
You should end up with a project graph that looks like this, after rearranging the boxes:

The default is for no audio. If you are going to be using audio with the BM64 (not currently supported on the SAM E70 Xplained Ultra board), then click on the BM64 Bluetooth box in the Project Graph (not BM64 Driver), and in the Configuration Options, select I2SC instead of No Audio under BM64 Interface. The following additional components will be added to the graph: I2S Driver, and I2SC1 Peripheral Library.
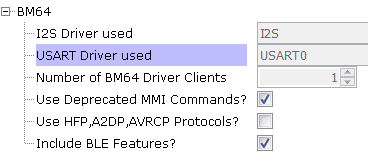
The following figure shows an example MHC configuration for the BM64 Bluetooth Driver.

The option Include Deprecated MMI Commands? identifies whether you intend to use the 1.0 or 2.0 version of the BM64 Audio UART Command Set, which is used by the MCU to send commands to the BM64 module and receive responses (events) back from the BM64. Version 2.0x deprecates some MMI commands, and adds some new commands to replace them.
The option Include HFP,A2DP,AVRCP protocols? identifies whether the driver should include the interface to support HFP, A2DP and AVRCP protocols. If you are building a BLE-only application with no audio, leave this option unchecked.
The option Include BLE features? identifies whether the driver should include BLE functions. If you are not using any BLE functionality, uncheck this option.
You can also bring in the BM64 Driver by itself, by double clicking BM64 under Bluetooth->Driver in the Available Components list. You will then need to add any additional needed components manually and connect them together.
|
MPLAB Harmony Bluetooth Help
|